
Daniel Pearce, Senior Health and Science Editor.
You catch your hand under the office lights on a Wednesday and there it is: a chip at the edge of your thumbnail, right where the mug handle sits. Three days ago that colour looked like it came out of a salon. The bottle even said ‘gel-effect’ on the label, which is the useful fact worth knowing before you buy another one: gel-effect polish isn’t gel. It doesn’t cure under a lamp and it doesn’t cross-link the way true gel does. It’s an ordinary air-dry polish with a heavier resin load, built to look glossy and hard while behaving, underneath, like any other varnish. Once you know that, the chipping stops feeling like bad luck and starts looking like a sequence of small, fixable steps: how you prep, how thin you paint, and where you seal. This guide walks through that sequence properly, so the next manicure survives the school run, the gym bag and the washing up.
- Prep decides more than the polish does: oil and moisture left on the nail plate are the single biggest reason gel-effect polish lifts within two days.
- Two thin coats beat one thick one: thick layers trap solvent underneath a skin that looks dry but isn’t, which is why the edges crack first.
- The free edge fails before the face of the nail does: capping the tip with every coat, including the top coat, is the step most people skip and the one that buys the most extra days.
Why ‘Gel-effect’ Isn’t Gel, And Why That Matters

True gel polish cures under a UV or LED lamp. The light triggers a chemical reaction that links the molecules into a dense, flexible network, which is why it survives washing up and gardening. Gel-effect polish air-dries the same way ordinary varnish does: the solvent simply evaporates, leaving pigment and resin behind.
Think of it the way a decorator thinks about varnish on a windowsill. Left to dry in the air, it goes hard to the touch within a day, but it stays more brittle than a two-part product that chemically bonds as it sets. Gel-effect formulas raise the resin content to mimic that gloss and some of that flexibility, and modern versions do it well. But the underlying chemistry is closer to a normal manicure than to a salon gel treatment, and that gap explains most of what goes wrong at home.
A 2019 study in the International Journal of Cosmetic Science measured wear on air-dry versus UV-cured nail films and found the cured films retained significantly more flexibility after repeated flexing. That single fact reframes the whole exercise: you are not trying to make a home polish behave like gel. You are trying to get the most out of a different, and genuinely decent, product.
Prepping The Nail Plate: The Step Everyone Skips
Most chipping starts with oil, not with the polish itself. Skin naturally produces sebum around the cuticle, and hand cream, washing-up liquid residue and even tap water leave a thin film that stops polish gripping the plate.
Before you paint, wash hands with plain soap, then wipe each nail with a cotton pad soaked in isopropyl alcohol or a dedicated nail cleanser from the chemist. Push the cuticle back gently with a wooden stick rather than cutting it, since cut cuticles heal unevenly and can lift polish at the base as they regrow.
Buff the surface lightly, just enough to remove shine, not enough to thin the nail. A single pass with a fine buffer block is usually plenty. Over-buffing is a common mistake: it weakens the nail and gives the topcoat less to hold onto, which sounds counterintuitive but shows up within days as flaking at the tip.
Dry hands fully before starting. Damp nails trap moisture under the base coat, and that moisture has nowhere to go once the top coat seals it in.
Thin Coats, And The Two-minute Wait That Saves The Week
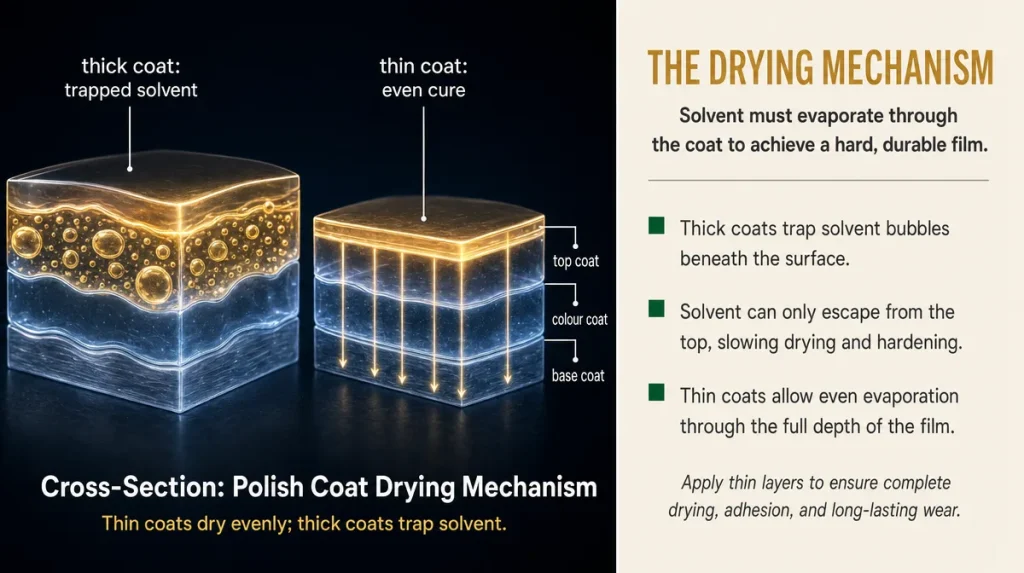
Thickness is where most home manicures fail. A thick coat looks touch-dry within minutes, but underneath that skin, solvent is still trying to escape. Trapped solvent behaves like damp under a fresh coat of paint on a wall: the surface looks fine until it eventually cracks along the weakest point, usually the tip.
Two thin coats of colour, each given a genuine two minutes before the next, outlast a single thick one almost every time. The base coat should be thin enough that you can just see the nail through it. Colour coats should look slightly streaky on the first pass and only even out on the second.
A fan or a cool hairdryer setting speeds surface drying but does not replace the wait, since the layers underneath still need time to release solvent. Rushing this stage is the single most common reason a manicure that looked perfect at 8pm shows dents by lunchtime the next day.
Sealing The Edge: The Mistake Behind Most Early Chips
Nails are used, not just looked at. Fingertips knock against zips, phone cases and car doors dozens of times a day, and the free edge, the very tip of the nail, takes almost all of that contact.
The fix is small and often skipped: with every coat, including the top coat, run the brush along the tip of the nail as if you were painting the edge of a piece of paper. This caps the layers so they wrap slightly under the free edge rather than stopping abruptly at the surface, which is where lifting begins.
People who paint only the top of the nail are, in effect, leaving the seam of the manicure exposed. It takes perhaps ten extra seconds per hand and is the difference between a chip on day two and a clean finish on day six.
Reading Your Own Nails: When To Redo And When To Leave Alone
Not every mark means starting again. A small dent near the tip can often be smoothed with a fresh, thin layer of top coat rather than a full removal, since the underlying colour is usually still intact.
A simple test: press the pad of your thumb gently against the nail in question. If the surface gives slightly or feels tacky, the polish hasn’t cured properly and a fresh top coat won’t fix that; better to remove and start over on that nail alone. If it feels hard and the mark is only cosmetic, a light buff and a new top coat layer will usually blend it in.
Lifting at the base, where you can see a gap between skin and polish, is different again and tends to mean the prep stage was rushed rather than the top coat. In that case, patching over it rarely holds for more than a day, and it is worth removing that nail properly rather than layering more product on top of a poor foundation.
What Matters And What Is Marketing On The Label
Labels now carry a lot of language: ’10-free’, ‘HEMA-free’, ‘breathable’, ‘salon strength’. Some of this reflects genuine formulation choices, particularly ingredient exclusions for people with sensitivities. Much of it says little about how long the polish will actually hold.
What tends to matter more, according to the wear-testing done by consumer publications such as Which?, is simpler: the resin-to-solvent ratio, the brush shape, and how evenly the formula self-levels as it dries. A polish that self-levels well forgives slightly uneven brush strokes, which matters far more day to day than whether the bottle says ‘gel-effect’ or ‘long-wear’.
Good Housekeeping’s testing tradition has long focused on exactly this kind of practical wear performance rather than ingredient lists alone, and that emphasis is worth borrowing at home: judge a polish by how it behaves on your own nails over a real week, not by the claims printed on the box. If a formula looks patchy on the first coat even after shaking and warming the bottle in your hands, no amount of top coat will fully disguise it.
Removing Gel-effect Polish Without Damaging The Plate
Because gel-effect polish is not true gel, it does not need soaking off with foil and it does not need filing back. Ordinary acetone-based remover will lift it, though it may take a little patience with darker or glittery shades.
Soak a cotton pad in remover, press it onto the nail for about ten seconds, then wipe in one direction rather than scrubbing back and forth, which can drag pigment into the surrounding skin. For stubborn colour, a short foil wrap for two to three minutes softens the polish enough to wipe cleanly.
The habit to avoid is picking. It feels quicker in the moment but it lifts layers of the nail plate itself along with the polish, leaving nails thinner and rougher for the next manicure. Nails that are picked repeatedly tend to hold polish worse over time, not better, which turns one bad habit into a recurring problem.
Building A Routine That Actually Holds Through A Working Week
A manicure is only as good as the week around it. Central heating through a damp British winter dries out both skin and nails more than the cold itself does, and dehydrated nails flex less predictably under polish, which shows up as earlier chipping at exactly the time of year people want their manicure to last longest.
A cuticle oil applied nightly, available cheaply at Boots or Superdrug, keeps the nail plate flexible enough to bend with knocks rather than crack. Reapplying a single thin top coat every two to three days extends the life of the whole manicure considerably, and takes under a minute.
Rotating two or three well-behaved formulas, rather than chasing whichever bottle is on offer that month, also helps: you learn how a particular brush and consistency behaves on your own nails, and that familiarity does more for the finished result than any single new launch on the shelf at Look Fantastic or in the Marks and Spencer beauty hall.
Key Takeaways
Gel-effect polish is an air-dry formula, not a cured gel, so it will never match salon gel for hardness. Most early chipping traces back to oil left on the nail, coats applied too thickly, or a free edge that was never sealed. Fixing those three habits does more for wear time than switching brands.
Judge results on your own nails over a real week rather than on label claims, and treat picking off old polish as the habit most likely to undo everything else you have done well.
A Quick Checklist Before You Paint
- Wash hands and wipe each nail with alcohol or nail cleanser
- Push back cuticles gently, avoid cutting them
- Buff lightly once, not repeatedly
- Apply a thin base coat, capping the free edge
- Apply two thin colour coats, waiting two minutes between each
- Cap the free edge with the top coat as well
- Reapply a fresh top coat every two to three days
- Use cuticle oil nightly, especially through the winter months
- Remove with acetone and a short foil wrap, never by picking
This article is general information and does not replace advice from a qualified professional.
Individual results vary depending on nail condition, product choice and application technique.